Sunday 26 September 2010

Never eat more fudge than you can lift!

It's official... I now have the European Fudge Mountain spilling out of my fridge!!
Does anyone want to come and help me eat it???

I like to stick to a balanced diet, so this fudge contains dark AND white chocolate!


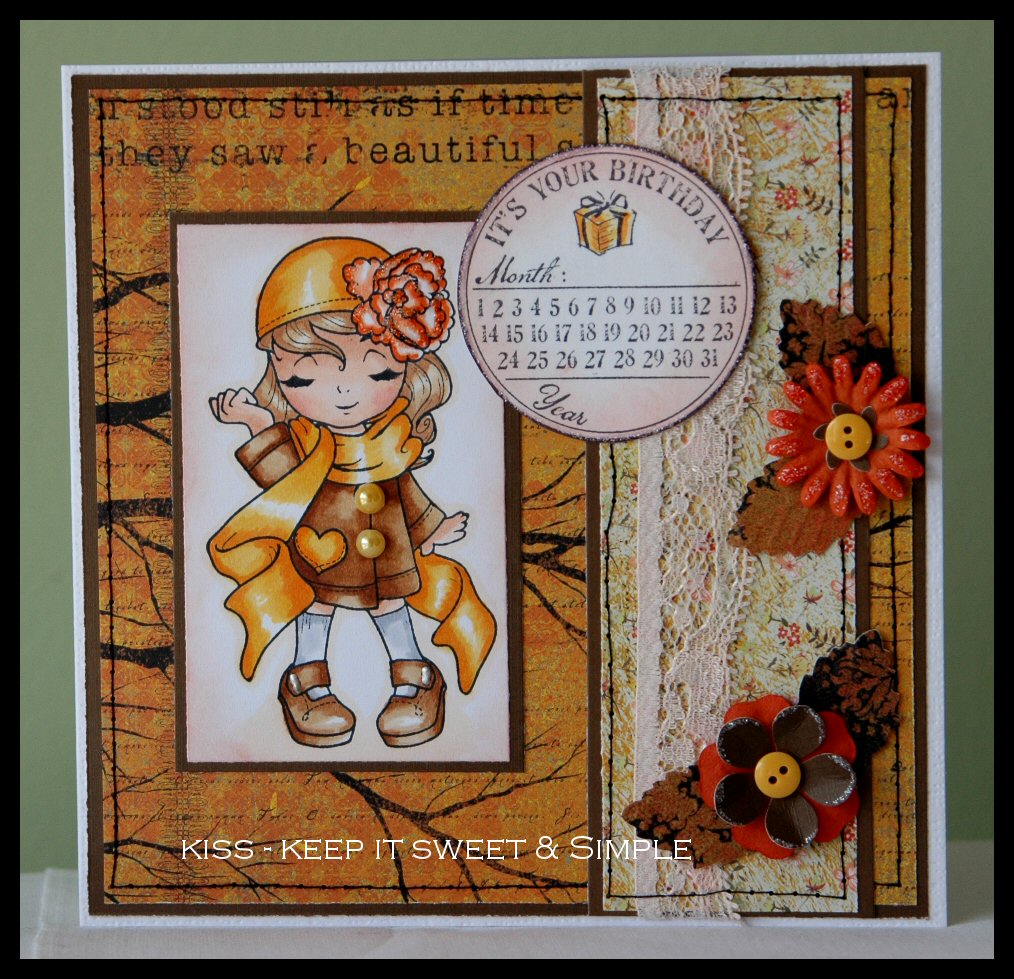
I would like to enter my packaging for the following challenges...
Just Magnolia - Dawny's  Sketch
Stamp Something - Fall Colours

I took a plain white box and distressed the edges with some orange chalk. I stuck my design paper all around the box and a piece on top.The tag was cut freehand and layered onto black card, punching a hole in the top and adding some ribbon. I stamped my text on one side. Then I added the layered DP and stuck Tilda on top with foam pads. Tilda is coloured with Copics and a glitter pen. Finally I added the 'Handmade' stamp.


Stamp - Magnolia Tilda
Design Paper - Memory Box, Blackbird.
'Just for You' and 'Handmade' stamps are from Catslife Press

The fudge is delicious and easy too make - no boiling and checking temps with a sugar thermometer!!
It does make quite a lot, but the recipe says it can be frozen, so it would be great to make some up for Christmas gifts.


Saturday 25 September 2010

Two presents are better than one!


Just got time to post my second Christmas card of the weekend, 
before I open a bottle of Sauvignon Blanc and settle down for a night slumped in front of the TV!


I was VERY naughty last week, and despite being totally skint, I persuaded hubby that I NEEDED some Christmas stamps.This is one of three stamps that I chose from the gorgeous selection at Lili of the Valley.
It's coloured with Copics and some gold stickles glitter.

Challenges - 
Fussy & Fancy - Mindy's fab. Sketch
Stamp with Fun - Stuffed Animals
Winter Wonderland - Deck the Halls with Boughs of Holly + Red/Green


Stamp -  Lili of the Valley - Xmas Ted presents for 2
Design Paper - Memory Box, Spiceberry
Holly leaves cut with Slice machine - Fa La La design card, for the berries I coloured the pearls with a Copic pen.
Sentiment - Craftwork Cards
Martha Stewart border punch.
Ribbon from my stash. 
************************************

O Christmas Tree

Morning everyone... hope you are all enjoying the weekend.
We have a bit of blue sky here in Yorkshire, but it's pretty cold and windy out there.
A good day for staying inside and cooking and crafting.
Hopefully I will have some treats to show you later :-)
Here's a card I made yesterday - I tried something a little different.


I layered my card and design paper up and stitched it in place. I cut some trees with my Slice machine and added them with foam tape. The paper is glittery already, but I sprinkled on a little extra and stuck on some adhesive pearls. I stamped the Merry Christmas text.
It needed something adding in the corner, but I just didn't know what! I ended up cutting a small tag and adding the bow, snowflake and button. I'm not really sure it works - especially the colour! What do you think?

Challenges - 
ABC Christmas - T is for Tree, with an optional extra of 'buttons'.


Here's a close up -   it's hard to see, but there is a lot of sparkle and glitter on this card.


Slice machine - trees and snowflake were cut with design card 'Fa La La'.
Snowflake was covered with diamond dust, trees with stickles and adhesive pearls.
Martha Stewart 'Arch Lattice' border punch.
Design Paper - My Mind's Eye, Signature Christmas.
Merry Christmas stamp is Catslife Press.
--------------------------------------------------

Friday 24 September 2010

Totally Papercrafts #35 It's a Kind of Magic

Well, you all loved Carol's 'Happy Birthday' theme last week, and we had loads of fabulous entries.
Pop on over to Totally Papercrafts to see who won the prize.

This week our host is Ria and she has chosen the theme of
'A KIND OF MAGIC'

We want to see anything with an element of magic - witches, fairies, wizards, magical creatures.....
If you need some inspiration check out the awesome work of my teamies.
If you click on their names it will take you to their blogs.
Don't forget that it's the last challenge of the month and that means that our sponsor is the amazing
Simon Says Stamp. Check the blog to see what the prize is.

I admit, I was a bit stumped on this challenge
until I thought of the most magical time of year - Christmas.


I layered up my card and design paper, and stitched it all into place.
I wrote the sentiment on my comp and then added the Pollycraft digi image.
The image is coloured with Copics and some stickles glitter.
I added a silver bow to the ribbon, popped on a snowflake, covered in Diamond Dust,
and placed a pearl in the centre.
Finally I added the swirl, which is a mixture of pearls and crystals.


Stamp - Pollycraft Digi 'Bronson & Beaker' coloured with Copics and stickles glitter
Design Paper - Memory Box
Snowflake cut with Slice machine - Fa La La Design Card, covered in Diamond Dust.
Pearl & Crystals - Say it in Pearls
Martha Stewart Border Punch
---------------------------------------------------------

Thursday 23 September 2010

Behind every great man there is a woman rolling her eyes!!!

I think I've finally cracked it... I have found my 'style' for men's cards - 
nice and simple, with not too much going on..
just like a man!!   :-)


For this card I followed Jay Jay's sketch at Simon Says Stamp
and would also like to enter for the 'Anything Goes' challenge at Charisma Cardz

This was another quick card to make - colouring the image taking longer than anything!
I stitched the card, DP and ribbon  in place and then cut the centre shapes on my Slice machine.
I love how this machine will cut a shadow of your chosen design ( as long as you design card is MS+)
These were then stuck down with tape and then Edwin went on top, using foam pads.
The stars were also cut with my Slice and stuck with foam tape.
I edged the small stars with some glitter and added the sentiment to the larger one.
Then finished off with some card candy.


Stamp - Magnolia 'Guitar Edwin', coloured with Copics.
DP - Daisy & Dandelion 'A Winter's Tale'.
Slice machine with 'Parties' Design Card
Card candy and sentiment -  Craftwork Cards

Tuesday 21 September 2010

Life is better on two wheels!

I had a mad scramble this morning, as I looked through  my stash of 'male' cards and found nothing suitable for my BIL's birthday at the end of this week.
He's into motorbikes, infact, at this every moment he and my SIL are travelling around Europe on their bike,
Bingo!  I found this bike image over at Bird's Cards. Have you been over there? Not only does Bird make  amazing cards, but she also generously shares her digital images and lots of other goodies.


This was a very quick and easy card to make - once I had layered the paper and card, I coloured the image with Copics. The star was cut with my slice machine - which also cuts a 'shadow' star. Great for layering.
Then I added the sentiment to the centre of the star, the spotted ribbon and the adhesive pearls.

I would like to enter the following challenges...
Stamptacular Sunday - 'Grid'
Cupcake Craft - 'Transport'
Spoon Full Of Sugar - Anything Goes'


Digital Stamp from Bird's Cards
Design Paper - Daisy & Dandelion 'A Winter's Tale'
Star cut with Slice machine - 'Parties' Design Card
Sentiment - Craftwork Cards
Black adhesive pearls and ribbon from my stash
~~~~~~~~~~~~~~~~~~~~~~~~~~~~~~~~~~~~~~~

Sunday 19 September 2010

Comfort glittering!!

I know all about comfort eating, but is there such a thing as 'comfort glittering'?
I think so..
I don't know what happened with this card - it just doesn't seem to work for me.
So, I tried throwing glitter at it, but I'm still not feeling it!
Never mind - it's another one for the pile and I'm sure it will come in useful.


I followed the sketch over at the Penny Black Challenge.
I hasten to add that my not liking the card is NOT a problem with the sketch - 
you just have to check out the fab DT work over there to see that.
Once my card was layered up I added the hedgies,
coloured with Copics, a little glitter on the rose and some glossy accents on the balloon.
I stuck the card candy on with foam pads and then the sentiment (made on my comp),
and finally added the flowers.

I would also like to enter this for the Secret Crafter Challenge,
where the theme is 'Anything Goes'.
They have some fab, new manga stamps just arrived in their store,
so go and check them out.

When I stood back and looked at the card it wasn't quite right,
so I snipped off the wired pearls that were on the blooms and got busy with the glitter!


Stamp - Penny Black, Long Kiss
DP - DCWV Valentine's Pack
Stickles glitter. Glossy Accents. Card Candy.
Baby's Breath Blooms from Wild Orchid Crafts.

Saturday 18 September 2010

A Trio of Treats !

Get your virtual sugar rush here
:-)
Hubby was out playing Golf, Suzie was snoozing, dreaming of chasing squirrels, so I took command of the kitchen!
First thing to go in the oven was a fruit cake. Now, I am not a fan of this sort of cake, so it's good for me to make when I am on a diet.. not much chance of me chomping my way through it.
It does look and smell delicious though... so I might just have to try a small piece.. in the interests of research!


Next came a batch of Chewy Date Cookies.
I love dates, and had a hard time adding them to the mixture and not just eating them, there and then.
I remember trips to the bakery when I was growing up... whilst other kids would pick the chocolate eclairs,
custard slices and cream doughnuts, I always wanted the date slice.
You don't really see them around much now.


And finally...   Tropical Crunch.
(Cereal with cashews, banana chips, dried apple pieces, apricots, dates, rasins and choc chips)
I made mountains of this, which is just as well, as hubby has chomped his way through one jar already!


Is that enough sugar for you?
:-)

Friday 17 September 2010

Totally Papercrafts #34 Happy Birthday

You lot definitely went 'dotty' last week.
Over at Totally Papercrafts we had a fabulous number of entries to the challenge -
pop over to the blog to see who the lucky winner is.

This week our host is Carol and she has chosen the theme of 
Happy Birthday
This can be a card for anyone, male or female, young or old,
so we are hoping to see a record number of entries.
:-)
The DT have put together a fantastic selection of cards to inspire you, so check them out and
if you have time take a nosey around their wonderful blogs.
Here's my card - using an image from this week's sponsor - Digi Doodle Shop


I kept  it pretty plain and simple, so that the car would be the focus. I just love these classic cars -
well, I have to say that, as my hubby's first love is his '68 Mustang!
This is Digi Doodle T-bird, coloured with copics ( my ONE dark, red!) The DP is Memory Box 'Spiceberry'
and the sentiment is a Catslife Press stamp.          Ribbon from my stash. Adhesive pearls were coloured black with a Copic.

+++++++++++++++++++++++++++++++


Thursday 16 September 2010

Autumn Colours

I had to suit up this morning to take the dog round the park... the full works - boots, hat, scarf and gloves.
Then the sun came out and it's blue skies all the way. Typical English weather!!

Here's another Autumn card - following the challenge sketch at Charisma Cardz.
 I am also entering this for the challenge at  A Spoon Full of Sugar,
where they want to see Autumn colours.


I layered up my card and DP's and stitched them in place, adding some lace to one panel.
The image was coloured with Copics, with a little stickles glitter on her hat flower, some adhesive pearls as buttons and some liquid pearls on her shoe straps.
The flowers were made with a purchased bloom and some punched centres, then I added a button and some glitter and finished off with some embossed XCut leaves.


Stamp - The Greeting Farm Twinkle Tots Madelynn
Design Paper - Memory Box 'Blackbird'
Text Stamp - Catslife Press
Stickles 'Frosted Lace'     Liquid Pearls 'Platinum'
Buttons and pearls from my stash.
Xcut punches for bloom centres and leaves.


=================================================

Wednesday 15 September 2010

While the cat's away, the mice will play!

House Mouse Challenge are celebrating their 2nd Anniversary with a special sketch and a blog hop.
Congrats ladies   xxx
You need to enter the challenge, visit the DT and collect the cheese  :-)
There are some fab prizes on offer and still plenty of time to enter.
(See the blog for full details)

Here's my entry.

I followed Lorraine's lovely sketch, just rotated it for my image to fit.
'Spoon Fed' is coloured with Copics and a little stickles glitter.
I know the stitching looks black, but in real life it's green!
Once my card and ribbon were layered up, I added a Craftwork Cards sentiment, the adhesive pearls and heart buttons.
Design Paper is DCWV Nan's Nursey, Baby Girl.


---------------------------------------------

Tuesday 14 September 2010

Every snowflake is unique.

How is everyone getting on with their Christmas cards?
There's only 102 sleeps to go!!!   :-)

Here's another card I have made to go on the Christmas pile.


I followed the challenge sketch over at Sketch and Stash.
and my newest stash is these Memory Box papers.. they are just gorgeous 
and if you head over to Crafty Emma's Store you can grab some before they all go!

I have been trying to be a bit bolder with my colouring, using deeper shades of my copics,
but it was a bit tricky with the red, because I only have one deep red pen.
I tried to lighten areas with my blender pen, but I can't get on with that at all.
It just seems to creat an ugly 'water' mark and make the paper look like it's been rubbed too hard!!
Practice, practice,  I suppose!


Stamp - Pink Gem Mimi with Snowman, coloured with Copics. I also added some  Liquid Pearls 'Platinum' to her coat buttons and some Stickles Glitter ' Frosted Lace' to the snowman and ground.
Design Paper - Memory Box 'Spiceberry'.
Snowflakes cut with Slice machine (Fa la la design card) and then covered with glitter.
---------------------------------------------------

Monday 13 September 2010

Every leaf speaks bliss to me, fluttering from the Autumn tree. ( Emily Bronte)

Well, Autumn seems to have well and truly arrived. My tumble dryer is working overtime and it won't be long before we have to fire up the central heating!!   I love it!!    It's my favourite time of year, and if I'm very lucky we will have a nice thunderstorm before too long!

Here's my latest card, using some lovely Autumn colours.

I followed Dawny's great challenge sketch over at Just Magnolia - which sent me scrabbling around in the kitchen cupboards looking for something to draw around for the large circle. I eventually found a glass sundae dish that was the perfect size!!
The tag was cut with my slice machine and I added some DP to the centre. Then I cut out my Tilda, coloured her with copics and stuck her on with foam pads. I used a punch for the small flowers, nipped the petals together to give them a little shape and added an adhesive pearl to the centre. I used card candy on the tag and the corners and finished off with some stickles glitter and the birthday sentiment.

I would also like to enter this card for Craft Yours Days Away - 'Girly 'n' Glitter'. ( Is it girly enough?? )
                                                  and  Allsorts - 'Colours of Autumn'


Stamp - Magnolia 'Flower Power Tilda'
Design Paper - Memory Box 'Blackbird'
Tag cut with Slice Machine - Basic Elements
Blooms - XCut punch
Card candy and sentiment from Craftwork Cards
'Diamond' Stickles glitter.
--------------------------------------------------------------------------------------------------

Sunday 12 September 2010

Carrot cake counts as eating vegetables, right?

I am going to make it one of my 5 a day!!!     :-)
Hubby has been bugging me to make carrot cake for ages, so I finally gave in.
This was VERY easy to make, just throw all the ingredients into a bowl and mix them up.


I also whipped up a batch of cupcakes and decorated them with chocolate butter cream and mini Oreos.
Not very pretty.... but yummy none the less!


Here's the recipe for the Carrot Cake. It's from  'Mary Berry's Baking Bible'.
If you give it a try, let me know how you get on.
Tip: I nearly took the cake out after 45 mins, because it looked ready on top, but I covered it with foil
and gave it another 5 mins, and I'm glad I did.

------------------------------------------------------

Friday 10 September 2010

Eat, drink and be scary!


Do you celebrate Halloween?
I don't think it every really caught on around here.
I did all the trick or treating when the girls were younger,
but last year, I don't think we had a single caller!
Shame -  I had to eat all the Halloween candy myself!!!


I made a little 'trick or treat' basket using the very easy template from
  Clear and Simple Stamps Blog.
It's only small, but I managed to fit a couple of bags of Mini Oreos inside. These bags are joined together in two's and as I ripped them apart, one split open, scattering Oreos everywhere. It was a mad scrabble between me and the dog to see who could grab the most. I think she won!!

For my card I used the lush memory Box paper 'Blackbird''.
It's so gorgeous that I didn't want to cover it up too much.
I paper-pieced a lot of my stamp and coloured the rest in with Copics.
I added the 'Oct 31st' text and a few adhesive pearls, colouring them black with a copic pen.


I would like to enter this for a couple of challenges, first of all Fab 'n' Funky, where the theme is "What'eva".
This means you can make anything you like!
And secondly Simon Says Stamp - 'Holiday Fun'.  Simon Says are also running a Stamp-tember Hop, that you DO NOT want to miss out on. Check their blog for all the details.

Recipe - 
Design Paper - Memory Box, Blackbird.
Stamp - Pink Gem Designs, Milly with Pumpkin.
Oct 31 cut with Slice machine - Fa La La design card.
Advesive pearls, coloured black with Copics.

Totally Papercrafts #33 Let's Go Dotty


We had lots of  'Charming'  entries over at Totally Papercrafts last week,
pop on over to the blog and see who the lucky winner was
and who I chose for the Top 3.
I am hosting this week's challenge and it's one that everyone will be able to join in -
the theme is
'Let's go Dotty'

I'd like to see dots on papers, dots on stamps, dots on ribbons.
Embossed dots, glitter dots and glossy dots.
You can go crazy, or just add a few!

Check out the fabulous work of my teamies,
and if you visit their blogs, comments are always welcome.

Here's my project...
a dotty birthday card and a box of chocolate, dotty cupcakes!!


The cupcake box and cases came from Sainsbury's - I just covered the box with Pink Petticoat's Digi Papers  - in blueberry. I added a die cut card, stamped the text and put a bloom in the corner.

For the card, I used the same dotty digi paper. I masked my cupcake stamps and also paper-pieced the cases. I added a little, green die cut tag, and an 'it's your birthday' stamp.


Digi Paper - Pink Petticoat 'Big dots little dots'
Die cuts and paper for the paper-pieced cupcake cases - Kaiser Craft La Di Da
Cupcakes, 'treat yourself' and 'celebrate' stamps - Simon Says Stamp, Savor Sweet Cupcakes
It's your Birthday stamp - Cat's life Press.

PS - the cupcakes were yummy!!!   lol**
-----------------------------------------------

Thursday 9 September 2010

A Good Hair Day !!!

How do you like my hair?
I asked for a Jennifer Aniston, 
but hairdressers never listen, do they???
:-)


Wednesday 8 September 2010

It's your birthday...celebrate with a bath!!!


This will be my pooch tomorrow ( minus the mice, I hope!!! )
as she goes to the groomers for a bath and a haircut.
I have to keep it quiet though - if she suspects that's where she's going
she will hide under the cupboard and refuse to come out!

This is my card for the House Mouse challenge,
where the theme is 'Make a Splash!'

It was a very simple and quick card.
I coloured the image with Copics and added glitter to the bubbles.
The little doggy is a button - I just used pliers to snip off the shank
and the 'happy birrthday' is lifted with foam pads.


Stamp - House Mouse 'Soggy Doggy'
Design Paper - Basic Grey - Max & Whiskers
Happy Birthday Stamp - Cat's Life Press
(Papers and text stamp available at Crafty Emma's Store )
--------------------------------------------------------------------------------------------

Tuesday 7 September 2010

Glitter Reindeer

I have been a terrible blogger recently, but in my defense, I have had a new toy to play with. I got a
Making Memories Slice machine for my birthday  :-)
So I have been playing at cutting out shapes and getting used to the machine. I already know I am going to LOVE it!

Here is my first card using it. It's a little bit different to my usual style, mainly because I used no stamping,
but the more I look at it, the more it's growing on me...lol**


My Slice machine cut the reindeer, the large snowflakes and the small tags.
I covered the reindeer with Diamond Dust, and I used a punch for the centre of the snowflakes,
then added a pearl and some stickles glitter.

I would like to enter for the following challenges 
Sketch Saturday - Jeanette's Sketch. (Now I have looked at the sketch again, I have missed out the strip across the middle, so just delete me if I don't qualify to enter!)
A Spoon Full of Sugar - 'Animal Crackers'.


Making Memories Slice - 'Fa La La' Design Card
Xcut Snowflake Embossing Punch
Design Paper - My Mind's Eye, Signature Christmas
Stickles glitter, Diamon Dust and Adhesive Pearls
------------------------------------------------------------------------------------------------

Monday 6 September 2010

It's The Bombe!!


The Ice-cream Bombe!!

Do you love ice-cream?  Then this is the dessert for you. It's so easy to make - just basic assembly, and you can use whatever ice-creams and sweeties you like. I made this for a family meal and it was a big hit. Next time I will use ice-creams that are more of a contrast and try and be a bit neater!

1 litre ice-cream.
750ml ice-cream
500ml ice-cream
chocolates or sweeties
1 loaf madeira or chocolate cake.
white chocolate for decorating.

I used 1 lite of Triple Chocolate, 750ml of Latte Macciato and 500ml Vanilla. Freeze a 20cm, freezer proof bowl. Soften the chocolate ice-cream in the fridge, enough so that it will spread easily. Then, using a spatula spread it around the inside of the bowl. Refreeze for about 30 mins, until the ice-cream is hard again.
Soften the Latte ice-cream in the fridge, then spread this in the same way, making a layer inside the chocolate one. Refreeze.
Soften the Vanilla ice-cream and then stir in your chocolates or sweeties. I used After Eights, broken up, but you could use chocolate truffles, fudge,  or maybe try it with smarties, or broken up crunchies!!
Fill the space you have left with the vanilla ice-cream.
Thinly slice the cake (I used chocolate swiss roll ) and cover the ice-cream completely. This will make a base for your ice-cream and stop it sliding around on the plate when you turn it out. Cover with clingfilm and refreeze.
To serve, melt the white chocolate.  Warm the bowl of ice-cream slightly, by dipping it in boiling water, and turn it out onto a plate. Drizzle with the chocolate and leave to soften slightly before cutting it.
I returned mine to the freezer until we were ready for it, and found that it cut fairly easily while still frozen. I think I used quite soft ice-cream though.


Friday 3 September 2010

New Baby Boy

Mad, crazy friends of ours are having another baby ( their 3rd ) due in the next couple of weeks.
Hubby said - "it's definitely a boy."   "Well, I think it is... maybe...  it might not be though!!"
So - if it turns out to be a little girl I will have to dash for the pink papers!!


I saw this cute little baby carriage and just HAD to make one.
I downloaded Niki's excellent template - here
I haven't filled mine yet - I need a trip to the sweetie shop -
but I thought a little bag of blue, sugared almonds would be perfect. 


For the card I followed the great sketch by Paola,
over at A Spoon Full of Sugar.


Stamp - Whimsy Digital Stamps, Sweet Little Donkey, coloured with Copics.
'A New Baby Boy' and apron stamp from a     set
Design Paper - DCWV Nana's Nursery, Baby Boy.
Edge paper punch - Martha Stewart Lace 
Buttons, card candy and ribbon from my stash.
-------------------------------------------

Totally Papercrafts #32 Charming


Morning everyone..
lots of you will be on the final days of the summer hols this weekend.
Hooray!!!
Time to get those last minute uniforms sorted and
put your child's name into everything they posess!!
And, it's also time for a new challenge over at

This week, the lovely Joanne has chosen the theme of

''Charming''

We want to see your card or project with an added charm.
These are readily available from most craft stores now -
or maybe you know how to make your own!
!
Pop on over to the challenge blog to see the fab work of my teamies,
and if you stop by their blogs,
don't forget to leave them a lovely comment.

Here's my card -
using a cute image from this week's sponsors - 


I have a stack of these cards (152mm x 104mm )
that I find a bit too small, so to create a more workable area
I have added an extra piece of card to the top of them.
My image is coloured with Copics 
and the mushroom is dabbed with liquid pearls.

The heart charms were in my local craft shop, in the jewellery section,
I used split rings to add them to a  straighter piece (don't know what that's called!)
then threaded it with little beads.
I have rescued a little pair of round nose pliars from my dh's toolbox,
for these fiddly jobs!!!
I will give them a much better home.
:-)


Digital Stamp - 'Ratiny's Mushroom Home Soft Pencil Digis
DP - Kaiser Craft La-Di-Da
Huge thankyou to Faye who sent me this gorgeous paper pad as part
of a blog candy prize.